LESSON-7:
7.1 Pan:
During using AutoCAD you will need to move your workspace several times at different directions, which is called pan. This is done simply by pressing the mouse wheel (the cross hair will turn into a hand) and then moving the workspace as you are grabbing it.
Another way is to clicking the icon below the workspace 
7.2 Zoom:
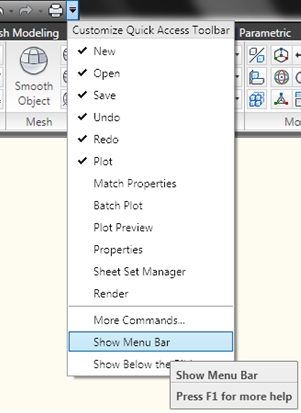
A very useful and frequently used tool. This is done simply by scrolling the mouse wheel. Scrolling up results zooming in and scrolling down results zooming out. But you will need some other zooming options. To use those click the arrow on Quick Access toolbar, select Show Menu Bar. On the Menu Bar, click View > Zoom. You will have the tools like below.
Or go to the "View" tab, on the "Navigate" panel you will find the zooming tools.
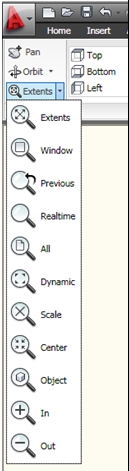
Realtime:
normal zoom operation to the whole workspace. Click the left mouse button and drag the cursor downward, it will cuase zoom out.
inversely click the left mouse button and drag upward to zoom in. This zoom action is done within the extent of the current view.
Previous:

Shows the previou zoomed view. in this case, up to 10 views are saved.So that the last 10 views can be recalled.
Window:

This option prompts the user to pick two corners of a box on the existing view and enlarges that area to fill the display.
Dynamic:

Permits very quick movement around the drawing. Once selected, this option redraws the graphics area of the screen and displays two rectangles. The larger box shows the extents of the current drawing. The smaller box shows the current view with an "X" in the middle. This moves with the mouse. This view box should be positioned so that its lower left corner is at the lower left corner of the view required. By pressing the left button on the mouse, the "X" is replaced by an "> " pointing to the right side of the view box. This allows you to change the magnification. As the mouse is moved, the view box shrinks and expands so that the size of the required view can be set. The left mouse button toggles between PAN "X" and ZOOM "> " mode so that fine adjustments can be achieved. When the view required has been selected, press <ENTER> or right click to let AutoCAD display it.
Scale:

Creates zoomed view for a given magnification number. If you give a value "n", then a view of n times of the current view will be displayed.
So clearly any number below 1 will cause zoom out, and above 1 will zoom in.Now, If "X" is inserted after the number (like 2x) then the
factor is applied to the current view. If "XP" is inserted after the scale factor, then the view is scaled relative to paper space.
Center:

This option requires two inputs: a point that is to be the center of the new display and a value to be its new height in drawing units.
The existing height is the default for the new height to allow for panning across the drawing. If the new height value is followed by "X" (like 2x), then it is taken as a magnification factor relative to the current height. If followed by "XP", then it is taken as a scale factor relative to paper space and can be used for scaling the contents of paper space viewports.
Object:

zooms only selected objects on the workspace to cover the whole screen. This is useful when you need to work
on a specific object.
In:

Clicking this icon will zoom in the drawing by about 50%.
Out:

Clicking this icon will zoom out the drawing by about 50%.
All:

This option causes AutoCAD to display the whole drawing as far as its drawing limits or drawing extents (whichever is the greater of the two).
Extents:

This option will display all the graphics that are contained in the drawing (referred to as the drawing extents) with the largest image possible.