LESSON – 6:
6.1 Status bar:
The status bar tools are essential parts of AutoCAD drawing. Suppose, you need to draw a line from the midpoint of another line, or endpoint of another line; or you need to draw absolutely straight lines. In these cases you can’t do a precise work by eye estimation. The tools in status bar ( polar, snap, osnap, ortho etc.) make these selections precisely.

Fig.: using icon view.
First, let’s have a quick look on the functions of the tools:
SNAP: also toggled using the F9 key. When snap on, the cursor under mouse control can only be moved in jumps from one snap point to another.
GRID: also toggled using the F7 key. When set on, a series of grid points appears in the drawing area.
ORTHO: also toggled using the F8 key. When on, lines, etc. can only be drawn vertically or horizontally.
POLAR: also toggled using the F10 key. When set on, a small tip appears showing the direction and length of lines, etc. in degrees and units.
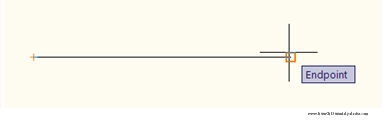
OSNAP: also toggled using the F3 key. When set on, an osnap icon appears at the cursor pick box. Which means an end point, mid point, centre etc. is indicated and attracts the cross hair.
OTRACK: when set on, lines, etc. can be drawn at exact coordinate points and precise angles.
DUCS: Dynamic UCS. Also toggled by the F6 key. Used when constructing 3D solid models.
DYN: Dynamic Input. When set on, the x, y coordinates and prompts show when the cursor hairs are moved.
LWT: when set on, lineweights show on screen. When set off, lineweights only show in plotted/printed drawings.
QP : if any object is selected, its basic properties are shown.
OSNAP: this is probably the most important tool among the ten. Right click on the button and select the points you want to snap on an object.
Endpoint - snaps to either the beginning or the end of an object such as a line
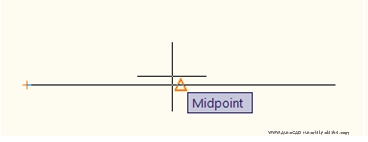
Midpoint - snaps to the exact middle of a line or an arc
Center - snaps to the center-point of a circle or arc
Node - snaps to 'nodes'
Quadrant - snaps to any of the four quadrants of a circle
Intersection - snaps to the point where two object cross
Extension - Snaps to the phantom extension of an arc or line
Insertion - snaps to the insertion point of an object (such as a block or text)
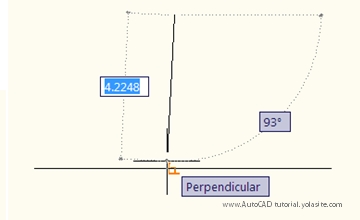
Perpendicular - will snap so that the result is perpendicular to line selected
Tangent - snaps to create a line tangent to a circle or arc
Nearest - will find the closest point an object and snap to that point
Parallel -Snaps parallel to a specified line

POLAR: Set it to show a certain angle. Right click on the button and select “Settings”. Then specify the angle you want to be shown.


Fig.: 0° angle shown by polar.
In the same manner (right click > settings) set all other buttons you need for a drawing.
DYN: if turned on, your given inputs are seen simultaneously on screen. So helps to avoid wrong command and makes commands easier with less calculation. If turned off, commands are not seen simultaneously, popped up only in the status bar.
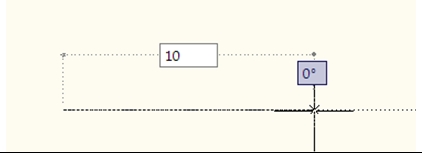
In the second image, both line length and angle with horizontal axis are shown. Use “TAB” button to toggle between these two value. This will make your commands much easier.
( Try the Exercise-3 in lesson-2 with Dynamic Input system)
LWT: you can choose different line width (or line weight) during drawing. But if LWT is turned off, no line weights can be seen. Any weight you select will appear as the same as the default weight.