LESSON – 2:
2.1 Choosing units:
To draw any plan, you need to draw some objects, like line, circle, rectangle etc. But before starting drawing, you have to choose the unit you want to work with. To set unit,
Write-“un”, then press enter. You will have the dialog box:
Select your length type, angle type, insertion scale and lighting intensity by clicking on the respective buttons.
It is convenient to choose Engineering or Architectural unit with “inches” scale. So choose so and choose the angle unit as you need. The lighting intensity unit is applicable for 3D drawing.
2.2 Drawing Objects:
To open a new drawing file, click the “New” button on Quick Access Toolbar. 
Then you will have a dialog box to choose your template. 
Select “acad.dwt” and press Open or double click. Now type “Z” <Enter> “E” <Enter>; this will zoom into to the extents of the drawing area and make it easier to see what you are drawing.
In the Home tab in Draw panel you will have the objects to draw.
Line
Keystroke Icon location
" L"  Home > Draw > Line
To construct a line from one point to another. The command should be co-ordinate based (as mentioned previously) or directly inputing the length (which is actually easiesr and used in practical field).
For example, if you need to draw a line 10 inch long, your command should be:
• “L”
• Enter (or click the icon)
• Specify first point : Click at the starting point and hold cursor towards the desired direction
• Specify next point : 10"
• Enter
• Esc
If you need to draw a line 2" away at the right of your last entered point, then you can do it by first drawing a 2" line, or you can give direct input. For that you have to use “@” symbol. The starting point should be indicated by co-ordinate (@2",0) then the length either by co-ordinate or by giving line length (relative co-ordinate).
Now, if the line needs to be drawn at a specefic angle, such as 45°, then the command should be:
• “L”
• Enter (or click the icon)
• Specify first point : Click at the starting point and hold cursor towards the correct direction
• Specify next point : 10"
• <
• 45
• Enter
• Esc
So, you can see that, during introducing angle the command is actually “Length < Angle” ( polar co-ordinate).
Circle
Keystroke Icon location
"C"  Home > Draw > Circle
Draw a circle based on a center point and a radius. But there are other inputs to draw. Click the arrow in the icon, there will be a drop down menu showing you the other options like center & diameter, 2 point, 3 point etc. 
For example, to draw a circle of radius 4", center at (1',1'), the commands should be:
• “C”
• Enter (or click icon)
• Specify center point of circle : 1' , 1'
• Enter
• 4"
• Enter
Rectangle
Keystroke Icon location
"R"  Home > Draw > Rectangle
Can be draw in 2 ways:
No.1, showing two opposite diagonal points of the rectangle.
No.2, giving the arm lengths of the rectangle (first along X axis, secondly along Y axis)
For example, to draw a rectangle 10" X 5" , the commands should be:
• “R”
• Enter (or click icon)
• Specify first corner point : Select any point
• @
• 10" , 5"
• Enter
Polygon
Keystroke Icon location
"POL"  Home > Draw > Polygon
Used to construct polygon, rectangle, triangle or any object consisting as many sides as needed of equal length.
Example:
• “pol”
• Enter (or click icon)
• Enter no. of sides: 6
• Select Center of polygon : 20,12
• Select one option : Inscribed in circle or Circumscribed about circle
• Enter radius of circle: 4
For the command “Inscribed in circle” or “Circumscribed about circle”; your object will be like or
or 
Remember, if you choose “Inscribed in circle”, the length of each sides of the object will be equal to the value of radius. On the other case, the lengths will be greater than the radius.
Arc
Keystroke Icon location
"A"  Home > Draw > Arc
Draws an arc of specefic dimension. Can be drawn in various ways. Click the arrow button on the icon. The options will appear.
For a 3 point arc, the command should be:
• “a”
• Enter (or click icon)
• Speify start point of arc : 10”,4”
• Enter
• Specify second point of arc : 1',4”
• Enter
• Specify end point of arc : 2',2”
• Enter
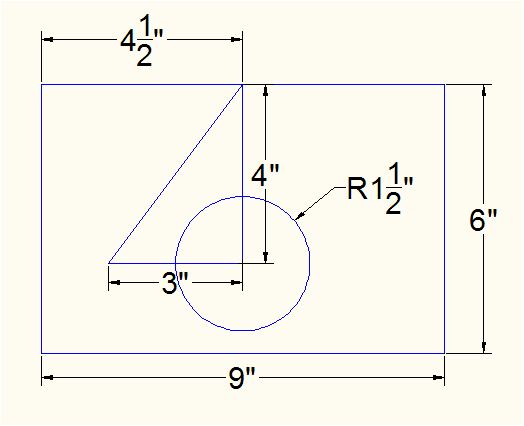
Try the exercises given in jpg format.
Exercise-1
Exercise-2
Exercise-3
© 2011-2016, AutoCADtutorial